Pages

Wednesday, January 15, 2025

How to add internationalization to your android application ?


Configure your project


First, you need to add the following configuration in your file build.gradle (Module : app) :


android {

.....

androidResources {
generateLocaleConfig = true
}

}

In the "res" directory, define the default language. To do that, you need to create resources.properties file with the following content  :

unqualifiedResLocale=en-US


You will probably need to resynchronize your project.


Define strings.xml for each country


You could create the string.xml file which will contains the translation

for the country you choose. For example, il you want to translate in Japanese,

create the strings.xml for Japanese :


You will see a strings.xml for the select country :


Define and use translation


In each strings.xml, you have to define variables with traduction .

Example: 


In the English strings.xml, you can set the value manually like this :
<resources>
    <string name="advanced">Advanced</string>
Then, in French strings.xml, you set the translation :
<resources>
    <string name="advanced">Avancé</string>


You can also define variables automatically (like advanced variable). To do that, put the cursor on a string you want to translate and do ALT - ENTER.

Then select Extract String resources :

Example :

In your code, you have the following line :
message: String = "Bienvenue !" 

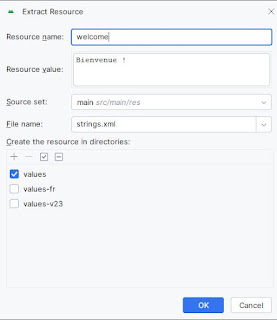
Put the cursor on "Bienvenue" and ALT ENTER . You'll see this screen :


Click OK and Android Studio will generate the following automatically :

message: String = stringResource(R.string.welcome)


Other way to use locale in your code

If your phone is in Japanese, then this will use the corresponding strings.xml file
In my small Android application QuizzBee, I load files according to language :

var country = Locale.getDefault().getCountry()
if (country == "FR") {
...


No comments:

Post a Comment

How to add internationalization to your android application ?

  Configure your project First, you need to add the following configuration in your file build.gradle (Module : app) : android { ..... andr...